Creating DNS Records for Office 365
 Office 365 is an electronic mail service provided by Microsoft. The following guide will show you how to add and configure the appropriate DNS records through your control panel.
AUSWEB does not provide any direct support on Office 365 or the creation of the records. This guide is provided as a reference only and is not considered a replacement for the official Microsoft support documentation located at:
Create DNS records at any DNS hosting provider for Office 365
Verify Your Domain
1. Go to the Domains section and click on Advanced DNS Zone Editor.

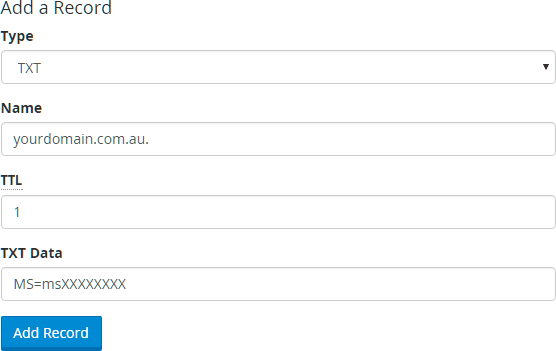
2. Under Add a Record enter the following values. Replace yourdomain.com.au with your domain name. This value MUST end with a period (.)
Name: yourdomain.com.au.
TTL: 1
Type: TXT
TXT Data: MS=msXXXXXXXX
Replace MS=msXXXXXXXX with your specific Destination value here, located from the Office 365 portal.

3. Wait a few minutes before you continue, so that the record you just created can update across the Internet. Now that you’ve added the record at your domain registrar’s site, you’ll go back to Office 365 and request Office 365 to look for the record. When Office 365 finds the correct TXT record, your domain is verified.
Adding The MX Record
1. Go the the Email section and click on MX Entry.

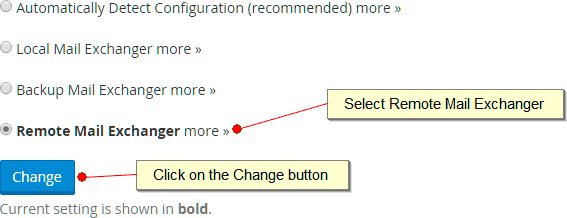
2. In the Email Routing area, select Remote Mail Exchanger.

3. Under the Actions column click on the Edit button.

4. Change the Destination field to:
domain-key.mail.protection.outlook.com
Replace domain-key with the value provided by your Office 365 configuration portal.

5. Click on Edit button again to save the changes.
6. Click on the Home link in the upper right hand corner. This will return you to the main cPanel screen.
Adding The CNAME Records
1. Go to the Domains section and click on Advanced DNS Zone Editor.

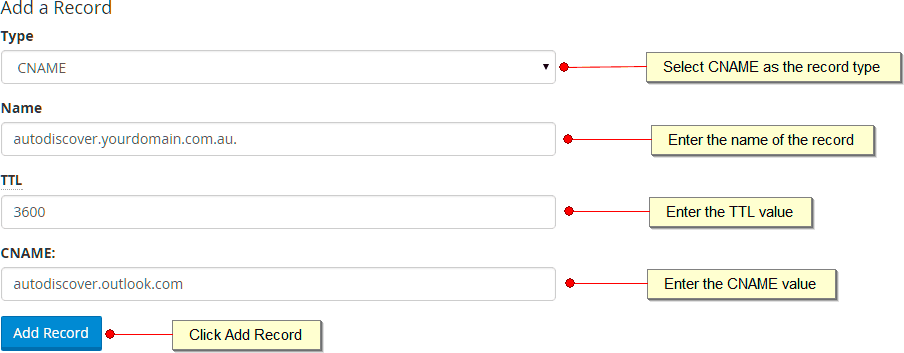
2. Under Add a Record enter the following values. Replace yourdomain.com.au with your domain name. Each of the name fields value MUST end with a period (.)

Name: autodiscover.yourdomain.com.au.
TTL: 3600
Type: CNAME
CNAME: autodiscover.outlook.com
3. Click the Add Record button when finished.
4. Repeat the same steps for the next three set of records.
Name: sip.yourdomain.com.au.
TTL: 3600
Type: CNAME
CNAME: sipdir.online.lync.com
Name: lyncdiscover.yourdomain.com.au.
TTL: 3600
Type: CNAME
CNAME: webdir.online.lync.com
Name: msoid.yourdomain.com.au.
TTL: 3600
Type: CNAME
CNAME: clientconfig.microsoftonline-p.net
Adding The TXT Record
1. Under Add a Record enter the following values. Replace yourdomainname.com.au with your domain name. Each of the name fields value MUST end with a period (.)

Name: yourdomainname.com.au.
TTL: 3600
Type: TXT
TXT Data: v=spf1 include:spf.protection.outlook.com -all
We recommend copying and pasting the TXT Data entry, so that all of the spacing stays correct.
2. Click the Add Record button when finished.
Adding the SRV records
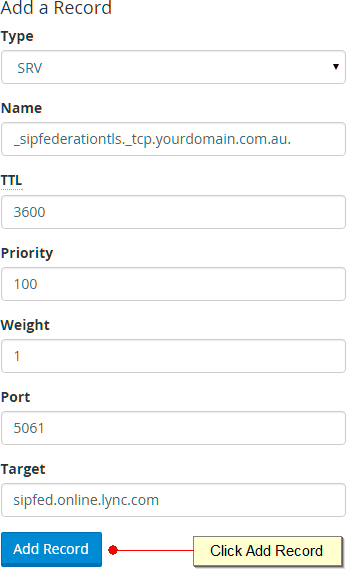
1. Under Add a Record enter the following values. Replace yourdomain.com.au with your domain name.

Name: _sipfederationtls._tcp.yourdomain.com.au.
TTL: 3600
Type: SRV
Priority: 100
Weight 1
Port: 5061
Target: sipfed.online.lync.com
2. Click the Add Record button when finished.
3. Under Add a Record enter the following values. Replace yourdomain.com.au with your domain name.
Name: _sip.tls.yourdomain.com.au.
TTL: 3600
Type: SRV
Priority: 100
Weight 1
Port: 443
Target: sipdir.online.lync.com
4. Click the Add Record button when finished.
Your records for Office 365 have now been created. Please allow 12-24 hours for these changes changes to take effect before testing your Office 365 mailboxes.

