Solving WordPress Automatic Upgrade Timeouts
This tutorial will show you the steps for solving WordPress automatic upgrade timeouts
For recent versions of WordPress, upgrading has been as simple as logging into your Dashboard, seeing the notification of a new version available and clicking the automatic upgrade link.
The process doesn’t always run smoothly and the most common error during the auto-upgrade is due to a timeout. Before you go running back to using the old way of backing up your files and database and performing a manual upgrade, this tutorial will guide you through some troubleshooting steps you can take to fix any timeout errors.
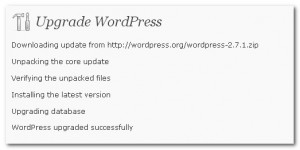
As above, upgrading newer versions of WordPress is as simple as clicking the upgrade link, which should show you the following screen:

If however, you see something like the following:
Downloading update from http://wordpress.org/wordpress-2.7.1.zip
Download failed.: Operation timed out after 30000 milliseconds with 351500 bytes received
Installation Failed
Here’s how you can get around the problem:- 1. Go to your WordPress installation folder using cPanel File Manager or your preferred FTP Client such as FileZilla
Find the following directory: /wp-admin/includes/ 3. Using cPanel File Manger, edit the file named file.php. If you are using an FTP client, download and open the file.
4. Search for the line that looks like this $response = wp_remote_get($url, array(’timeout’ => 30)); 5. Change the default value of 30 to something larger maybe 180 (which is counted in seconds) $response = wp_remote_get($url, array(’timeout’ => 180)); Save the file and try again after that. It should fix the timeout issue.
IMPORTANT: When you upgrade your WordPress install, you do overwrite the modifications you’ve just made resetting it to default – so this method needs to be repeated.
WordPress has a plugin called “Upgrade-Timeout” by Felix Ker which permanently fixes this problem, so you can also try that.

