Install an SSL Certificate on a Plesk Server
Once an SSL certificate is issued, you can install it on your domain using the Plesk control panel installed on your Web24 server.
Note: For Plesk panel versions up to version 11.0, you will need to assign a dedicated IP address for your website to install an SSL certificate.
From Plesk 11.0+ onwards, SSL certificates can be installed for websites hosted on a shared IP addresses (For Windows, IIS8 is required).
Collect Certificate and Private Key
- Login to Web24 Plesk control panel by going to http://admin.web24.com.au.
- Collect the certificate and the private key by going to Web24 Control Panel > All My SSL Certificates > Certificate Name
- Based on the type of certificate you have, you can download the CA bundle certificate using one of the following URLs:
Comodo Essential CA Certificates
Install the SSL Certificate
- Log in to the Parallels Plesk Panel as admin. From the left pane, clickDomains.
- Click on Open in Control Panel for the domain you want to install SSL certificate on.
- Depending on your version of Plesk:
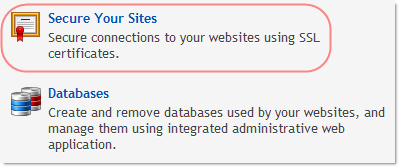
- Plesk 11.0-11.4 : Go to the Websites & Domains tab, and then click Secure Your Sites.
- Plesk 11.5+ : Go to the Websites & Domains tab, click the Domain name, and then click Secure Your Sites.

- On the next page, click the Add SSL Certificate icon.
- In the Add SSL Certificate section, input the appropriate certificate name.
- You can either upload the certificate as a file in Upload certificate filessection, or you can paste them into the relevant text boxes in Upload certificate as text section.
- Click Send Text.
- Go to the Websites & Domains tab, and click the domain name at the bottom of the page.
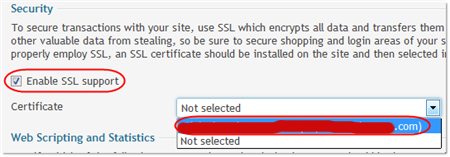
- Make sure that the Enable SSL support option is selected under Security, and select your SSL certificate from the drop-down menu.

- Click Ok to finish the SSL installation.
- You can verify the SSL certificate installation by entering the domain name in an online SSL checking tool such as http://www.sslshopper.com/ssl-checker.html

